文章段落

IAP 實作-部署到驗證步驟教學:
接著就來實際操作看看 IAP 的相關設定吧!在這個教學中我們將展示如何利用 Google Cloud 的 IAP 來實現零信任安全模型,為雲端工作負載提供更強大的安全保護。
建立並設定測試環境
步驟一:建立環境
- 在 Cloud Console,左側目錄點選 Compute Engine>Instance Templates.
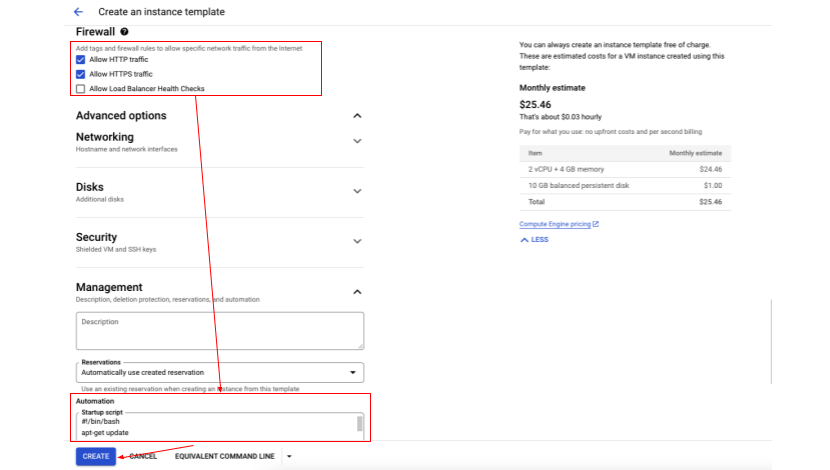
- 點擊上方 Create an instance template,除了以下設定其餘皆保持預設設定:
- Firewall:
- 允許 HTTP traffic
- 允許 HTTPs traffic
- 點選 Management, 下拉選單點選 Automation>Startup script,填入以下的開機腳本,它會建立一個簡單的網頁:
- Firewall:
#!/bin/bash
apt-get update
apt-get install apache2 -y
echo "hello! CloudAce" | tee /var/www/html/index.html
systemctl restart apache2
©2024 Google
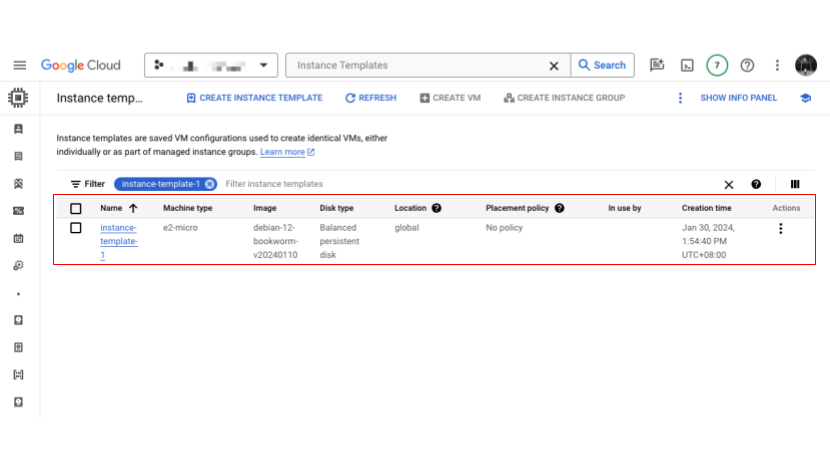
3. 點選下方 CREATE,建立 Instance Templates,完成後顯示如下圖。
©2024 Google
步驟二:建立 Health Check,檢查後端服務的健康。
- 在 Cloud Shell 中輸入以下 gcloud command 指令以建立允許 Health Check 探針流量的防火牆規則:


©2024 Google
gcloud compute firewall-rules create allow-health-check-fw
--direction=INGRESS
--priority=900
--network=default
--action=ALLOW
--rules=tcp:80
--source-ranges=130.211.0.0/22,35.191.0.0/16

©2024 Google
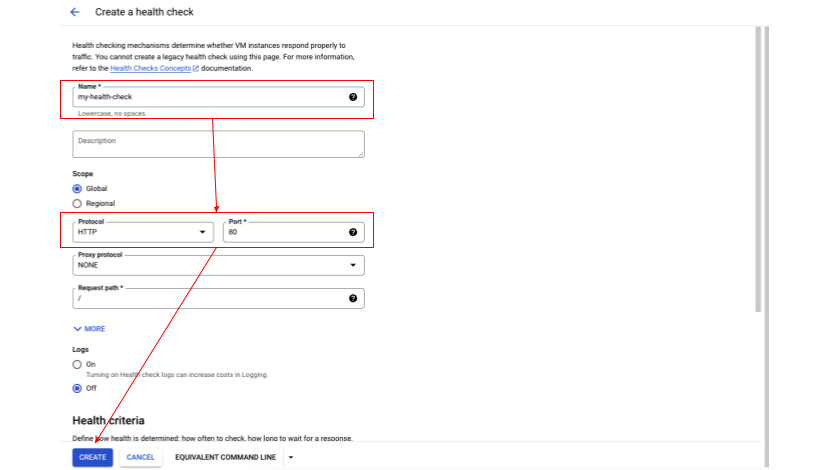
2. 在 Cloud Console,左側目錄點選 Compute Engine>Health Checks
3. 點擊上方 Create Health Check ,輸入以下資訊:
- Name:my-health-check(可自行決定名稱)
- Protocol:HTTP
©2024 Google

©2024 Google
步驟三:建立 Managed Instance Group,做為稍後建立 Load balancer 的 Backend,讓 VM 可以被自動化管理
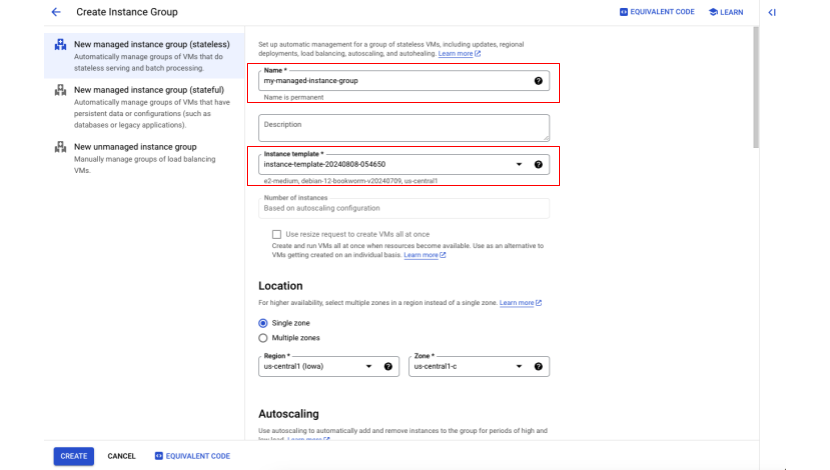
- 在 Cloud Console,左側目錄點選 Compute Engine>Instance Groups.
- 點擊上方 Create instance group,除了以下設定其餘皆保持預設設定:
- Name: my-managed-instance-group.(可自行決定名稱)
- Instance template:選擇步驟一建立的 instance template
- Location: Multiple zones.
- Region: us-central1
- Autohealing:
- Health Check:選擇步驟二建立的 my-health-check
©2024 Google

©2024 Google
申請託管憑證,並完成負載平衡設定
步驟四:利用 Cloud Endpoints 取得免費域名(如果已擁有域名,可以直接跳至步驟五)
- 使用 gcloud command 保留一個 global IP Address,並記下 IP Address 以便稍後使用
gcloud compute addresses create my-ip --project=[Your Project ID] --description=for-iap-labs --global  # 保留一個global IP Address


gcloud compute addresses describe my-ip --global #Print 出 IP Address 的資訊

©2024 Google
2. 點擊上方 Create instance group,除了以下設定其餘皆保持預設設定:
A. Name: my-managed-instance-group.(可自行決定名稱)
cat << EOF > enpointdns.yaml
swagger: "2.0"

info:

  description: "Cloud Endpoints DNS"

  title: "Cloud Endpoints DNS"

  version: "1.0.0"

paths: {}

host: "[Your Sub Domain].endpoints.[Project ID].cloud.goog"

x-google-endpoints:

- name: "[Your Sub Domain].endpoints.[Project ID].cloud.goog"

  target: "[Your IP Address]"

EOF

# 這裡將 Domain 設為:iap.endpoints.[Project ID].cloud.goog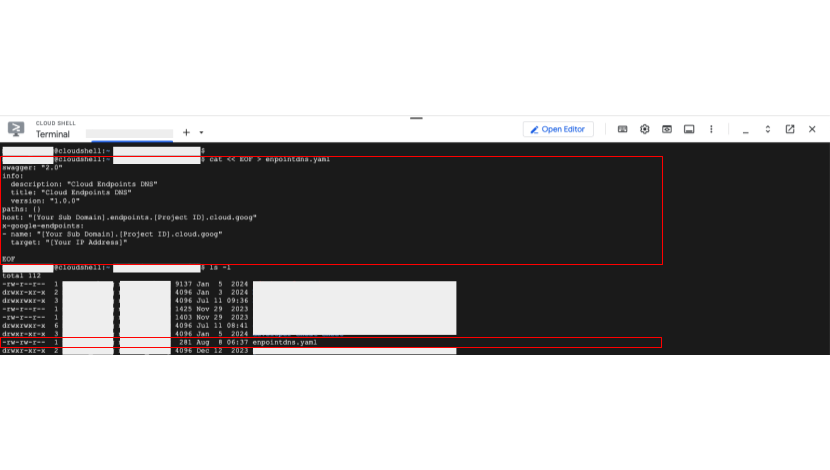
©2024 Google
3. 在 Cloud Shell 執行以下 gcloud command 部署 enpointdns.yaml:
# gcloud endpoints services deploy enpointdns.yaml

©2024 Google

©2024 Google
步驟五:在 Certificate Manager 中申請託管憑證
- 在 Cloud Console,左側目錄點選 Security>Certificate Manager.
- 點擊 Classic certificates 後,點擊 Create SSL certificate 建立託管憑證,輸入以下資訊:
- Name:my-managed-certificate(可自行決定名稱)
- Create mode:點選 Create Google-managed certificate
- Domain:iap.endpoints.[Project ID].cloud.goog
- 點擊 Classic certificates 後,點擊 Create SSL certificate 建立託管憑證,輸入以下資訊:

©2024 Google

©2024 Google
步驟六:建立 Load Balancer
- 在 Cloud Console,左側目錄點選 Network Services>Create a Load Balancer,點擊上方 Create a Load Balancer,選擇 Application Load Balancer(HTTP/S), 點擊 Start configuration.
- 選擇 From Internet to my VMs or serverless services 和 Global external Application Load Balancer ,點選 Continue
- 輸入名稱:my-load-balancer(可自行決定名稱)
- 點擊 Frontend configuration,除了以下設定其餘皆保持預設設定:
- Protocol:HTTPS
- IP Address:選擇先前建立的 my-ip
- Certificate:my-managed-certificate
- 點擊 Done,完成 Frontend 的新增

©2024 Google
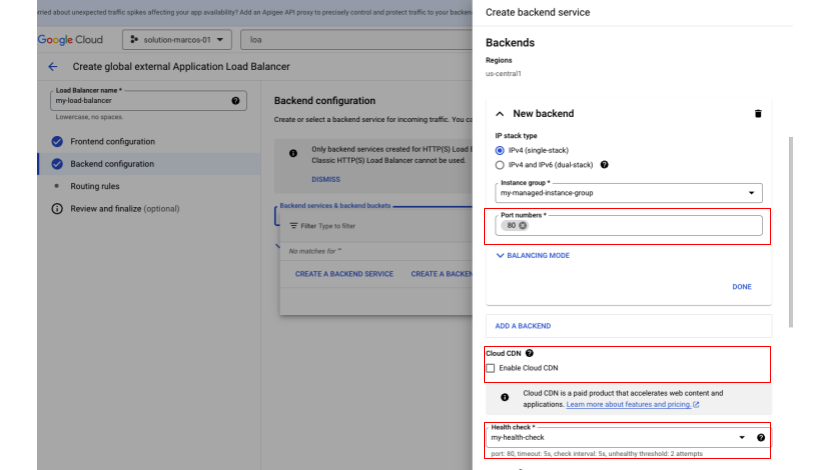
3. 點擊 Backend configuration, 點選 Backend services & backend buckets>Create a backend service,除了以下設定其餘皆保持預設設定:
A. Name: my-managed-instance-group.(可自行決定名稱)
3. 點擊上方 Create instance group,除了以下設定其餘皆保持預設設定:
A. Name:my-backend-service.(可自行決定名稱)
B. Instance group:my-managed-instance-group
C. Port:80
D. Cloud CDN:Disable (CDN 預設開啟,和 IAP 無法共同啟用)
E. Health check:選擇剛建立的 my-health-check
F. 點選 Create,完成 backend service 的新增

©2024 Google
©2024 Google
4. 點擊下方 Create,完成 Load Balancer 的建立

截圖自:Chrome 瀏覽器頁面
©2024 Google
設置與驗證 IAP 防護
步驟七:啟用 Identity-Aware Proxy API 並設定 OAuth consent screen
- 在 Cloud Console,左側目錄點選 Security>Identity-Aware Proxy ,選擇您的 Google Cloud Project
- 點擊 Enable API
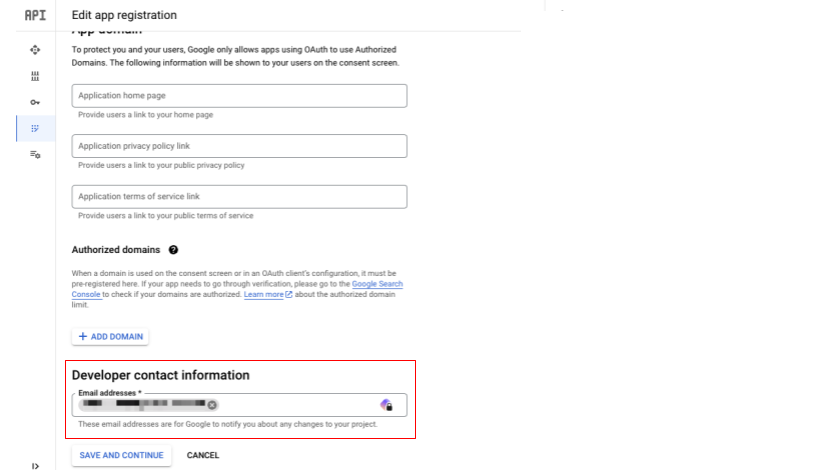
- 設定 OAuth consent screen :
- 在 Cloud Console,左側目錄點選 APIs & Services>OAuth consent screen,輸入以下設定:
- User Type:選擇 External,點擊 Create
- 在 Cloud Console,左側目錄點選 APIs & Services>OAuth consent screen,輸入以下設定:

©2024 Google
ii. Application name:my-web(可自行決定名稱)
iii. User Support email:填入您的 email
iv. Developer contact information:填入您的 email
B. Name:my-backend-service.(可自行決定名稱)

©2024 Google
©2024 Google

©2024 Google
步驟八:為網站啟用 IAP 防護並添加 principals 到 IAP 的允許清單
- 回到 Security>Identity-Aware Proxy 頁面,點選 Applications.
- 開啟 my-backend-service 的 IAP 開關

©2024 Google
4. 點選 Turn on.
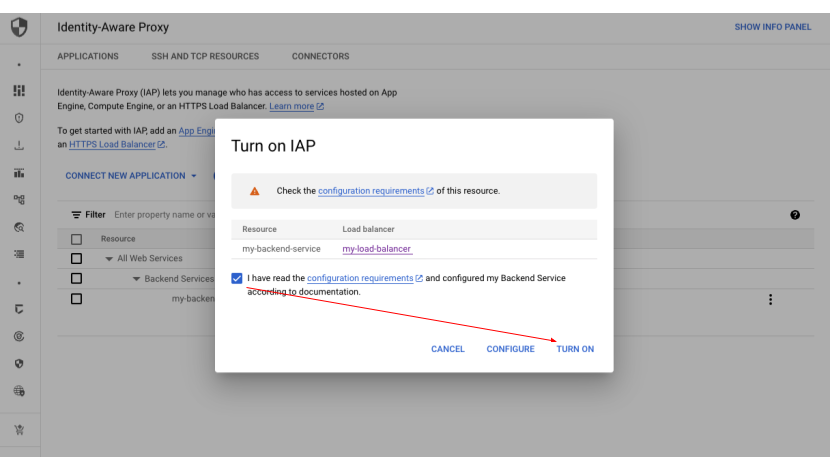

©2024 Google
6. 填入以下資訊,賦予可通過 IAP 防護的權限
- New Principals:輸入您的 user account email
- Role:IAP-secured Web App User
7. 點選 Save

©2024 Google
步驟九:驗證 IAP 是否設置成功
- 開啟無痕瀏覽器輸入 https://iap.endpoints.[Project ID].cloud.goog/,驗證請求轉發到 Google 的登入畫面進行身份驗證,即設定成功。
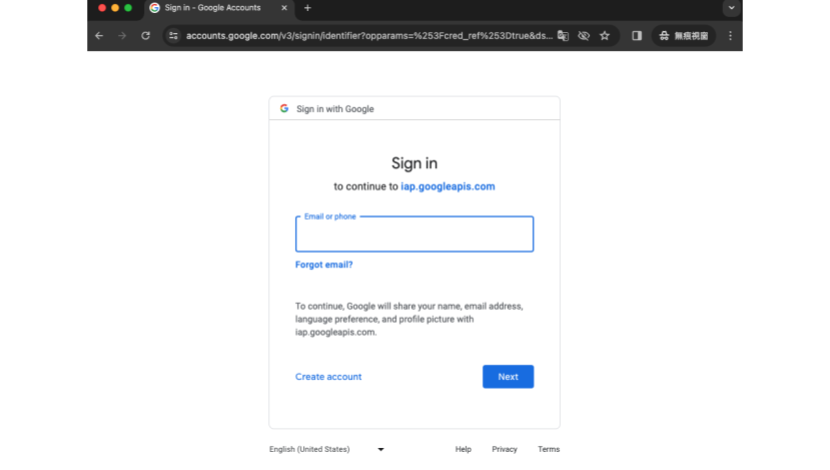
截圖自:Chrome 瀏覽器頁面
©2024 Google
結論
看完這次對 Gateway API 的介紹和相關功能的實作教學後是不是對 Gateway API 其他用途更有興趣了呢!如果對 Gateway API 服務上還有任何想了解的內容,歡迎聯絡 Cloud Ace 獲得更進一步的資訊。


![[GCP 資安攻略] GCP 資訊安全各項功能簡介](https://storage.googleapis.com/cloudace-tw-blog/1/2021/07/GCP-資安攻略-GCP-資訊安全各項功能簡介-300x157.jpg)