文章段落
DevOps 組合自 Development 和 Operations,代表文化、實踐和工具的結合。而 CI/CD 是實踐 DevOps 持續改善原則的方法,代表持續整合與持續交付或部署。本次示範如何將 DevOps 流程放上 Google Cloud(原 GCP),以更輕鬆地達成 CI/CD!
DevOps 教學前言:CI/CD 是什麼?如何達成?
CI:即「持續整合」
CI(Continuous Integration)指的是持續整合,也就是將新版的程式碼自動建置和測試,確保程式碼沒有問題。CI 的主要目的是更快地發現和解決錯誤、改善軟體品質,並不斷進行小幅度的改動,進一步減少驗證和發布更新所需的時間。因此 CI 讓開發人員能在流程的早期發現整合問題和錯誤,並簡化代碼分支和建置。
CD:即「持續交付」或「持續部署」
CD 可視團隊狀況定義為持續交付(Continuous Delivery)或持續部署(Continuous Deployment)。其中持續交付代表將程式變更推送到測試環境,確保它是一個隨時可以部署到正式環境的狀態,而持續部署則是讓程式完全自動部署到正式環境(不用手動部署),也是更成熟的 CD Pipeline。
如何達成 CI/CD?
在《DevOps 教學:利用 GitLab、GKE 五步驟達成 CI/CD》中我們除了要自己辛苦打造 GitLab Server,過程中還超多地雷…….。這次要輕鬆一點,把整個 DevOps 流程都放在全代管 GCP 服務上,不要再自己建Server了。除此之外,會再善用 Git 分版本來達成 GitOps,把整個環境用 Code 來處理,也就是所謂 “environments-as-code”。
今天的實作是參考 “GitOps-style continuous delivery with Cloud Build” 來實作的,各位有疑問可以深入研究這篇文章。
整個 DevOps 環境如下:
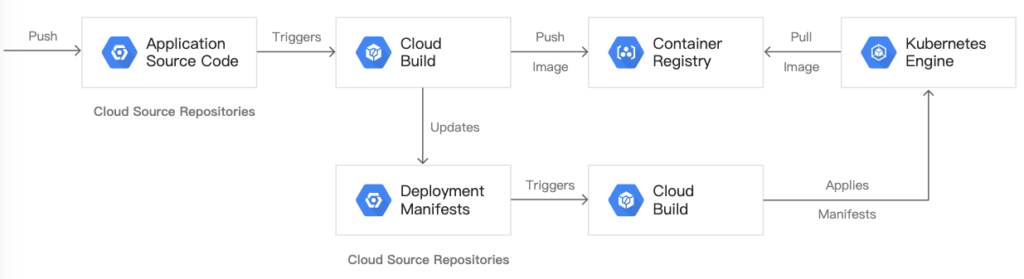
過程中會建2個 Git Repositories,首先程式碼Push到 app repository,Cloud Build 會跑測試、建image然後push到 Container Registry。接下來 Cloud Build 又會更新 Deployment 設定檔,並且把設定檔push到 env repository,這個動作會觸發另一個 Cloud Build pipeline去套用到 GKE Cluster,如果成功,會把設定檔存在env repository的另一個Git分支。
我們會讓 app 和 env repo 分開,因為它們的用途不同。App repo 的使用者是「真人」,env 的使用者是「假人」?咦不是啦!是自動化系統如 Cloud Build 和其他會用到它的應用程式。而且這 env repo有幾個分支分別對應到特定的環境,也會參考特定的 container image,而 app repo 則沒有。
看完之後,你應該會有一個系統能做到:
- 在 Cloud Build 的history區分出成功和失敗的deployment
- 在env repo的production分支存取當前的設定檔
- 重新執行對應的 build 動作回滾到先前的版本
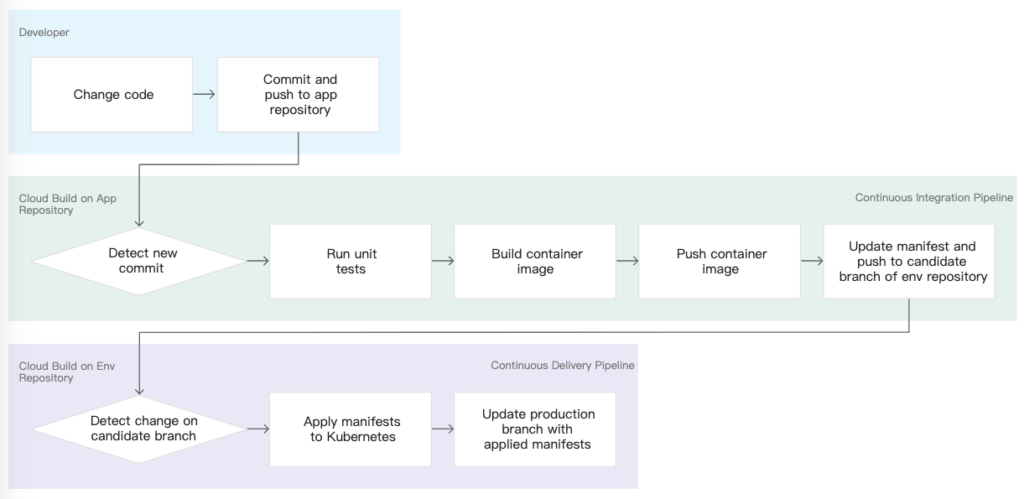
整個 DevOps 流程如下:
DevOps 教學步驟一:基本環境建立
建立 GKE Cluster
gcloud container clusters create hello-cloudbuild –num-nodes 1 –zone us-central1-b
因為要等幾分鐘讓Cluster開好,等不及可以開另一個 Cloud Shell 登入 Git
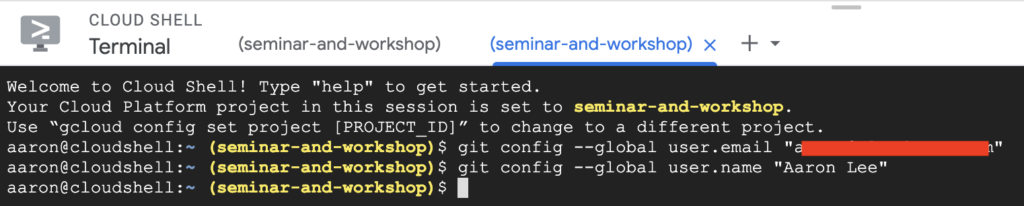
git config –global user.email “xxx@xxx.com”
git config –global user.name “Aaron Lee”
執行 credential helper,它讓你的帳號連到 Cloud Source Repositories

接著建立2個 repo,app和env

然後去
https://github.com/GoogleCloudPlatform/gke-gitops-tutorial-cloudbuild
把範例程式碼拉下來

接下來設環境變數,一定要設好,後面就不用每次key source repo那個長長的網址:
cd ~/hello-cloudbuild-app
PROJECT_ID=$(gcloud config get-value project)
git remote add google \ “https://source.developers.google.com/p/${PROJECT_ID}/r/hello-cloudbuild-app”

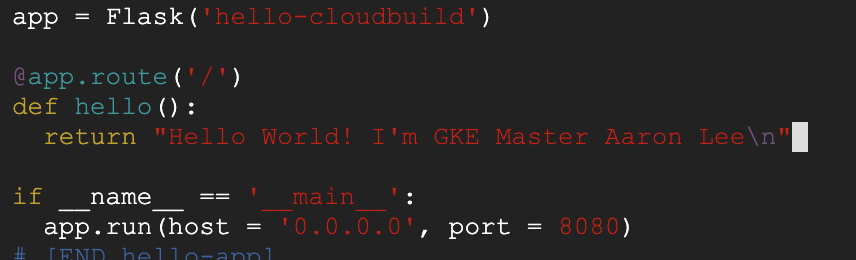
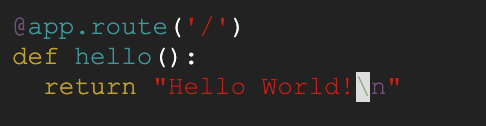
進app.py稍微改一下名字,證明自己真的有做過~
vim app.py
來看一下Dockerfile
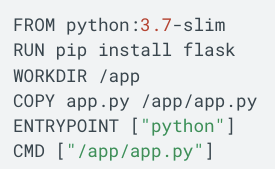
我們會用 Cloud Build 建image並儲存在 Container Registry。
然後我們要先把 commit id取出來,之後建image會用到它。
COMMIT_ID=”$(git rev-parse –short=7 HEAD)”
DevOps 教學步驟二:建立 Container Image
現在我們要建 image了!
加 tag 包含 commit id (這樣放到 GCR也可以識別)
gcloud builds submit –tag=”gcr.io/${PROJECT_ID}/hello-cloudbuild:${COMMIT_ID}” .

完成!

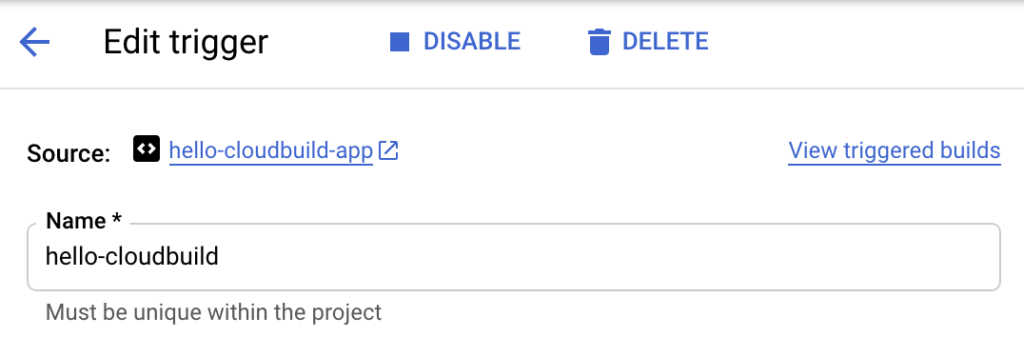
DevOps 教學步驟三:建立 CI pipeline (就是建trigger)
直接去 Cloud Build 的頁面點擊 Create Trigger
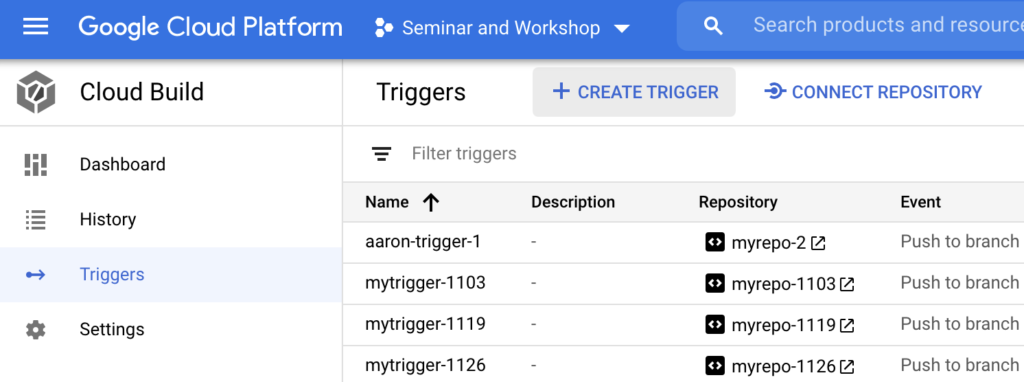
取名 hello-cloudbuild
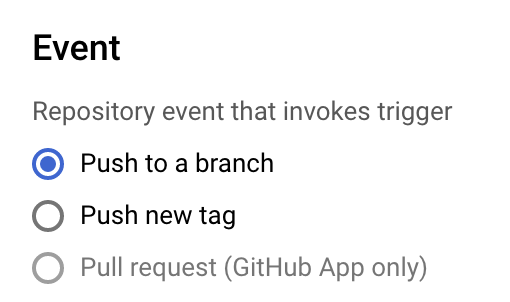
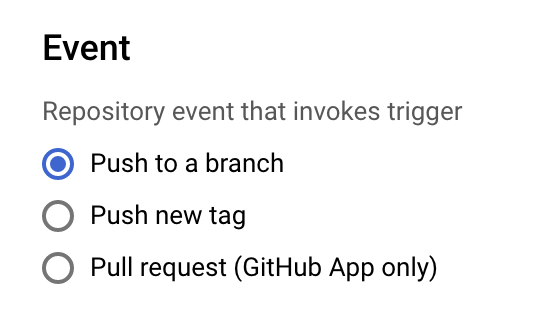
在 Event 選擇 Push to a branch
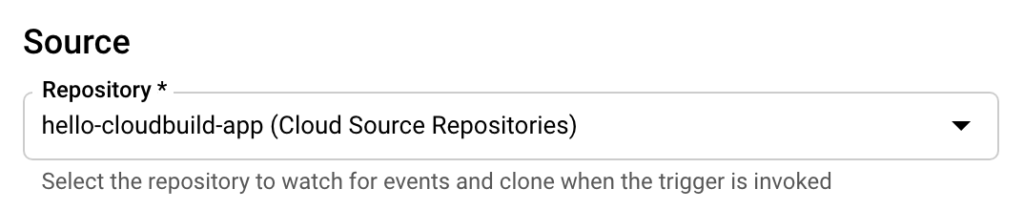
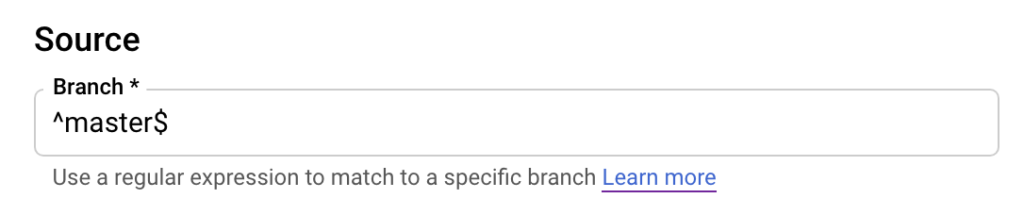
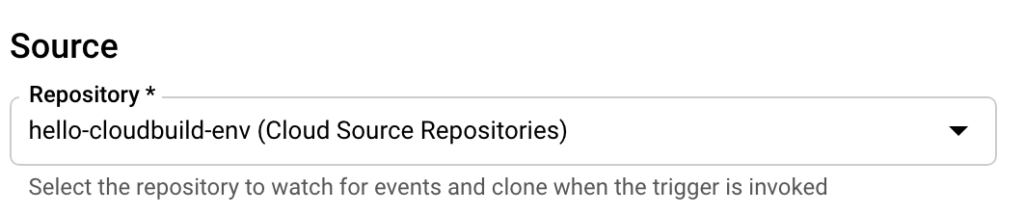
在 Source 部分選擇 hello-cloudbuild-app ,以及 ^master$ 做為 Branch
Build Configuration選擇 Cloud Build configuration file
檔名取 cloudbuild.yaml
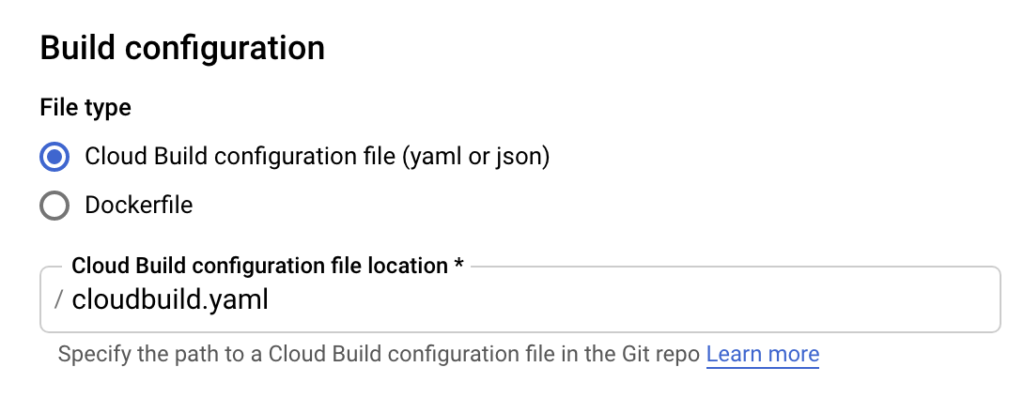
OK的話就按 Create。
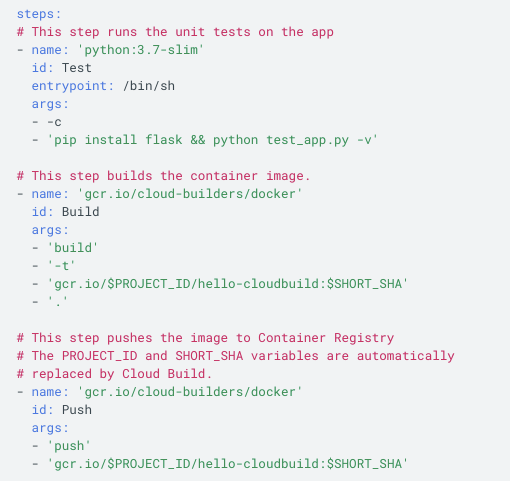
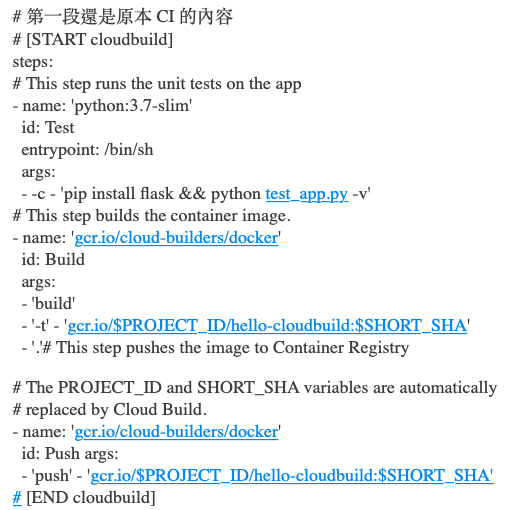
看一下這個檔案內容,這是 cloudbuild.yaml第一版的檔,只做CI
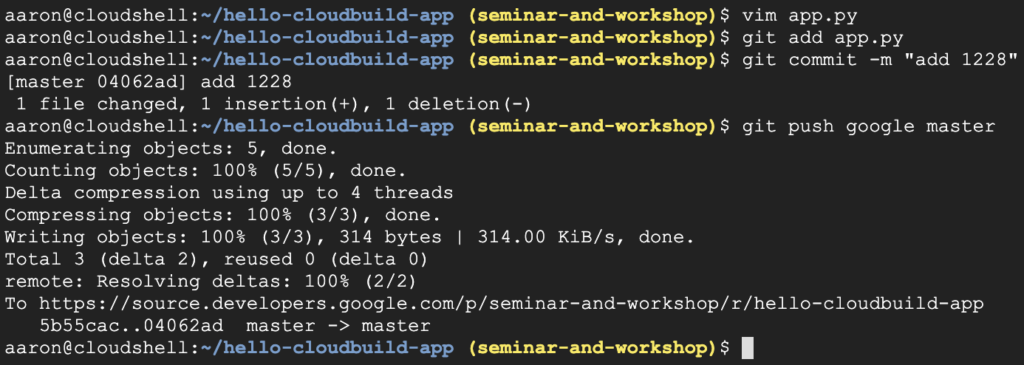
Trigger建好了,那我們來push code看看

但是因為 code 沒有變動,所以沒有觸發 Cloud Build 的Trigger來建image
那我故意再改一下:

送出了:
結果有問題

測試失敗?
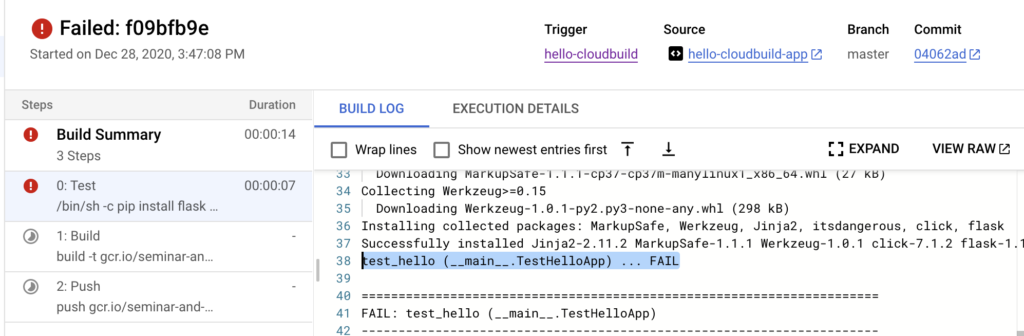
我們仔細看一下 Log:
Step #0 – “Test”: self.assertEqual(hello(), “Hello World!\n”)
Step #0 – “Test”: AssertionError: “Hello World! I’m GKE Master Aaron Lee 1228\n” != ‘Hello World!\n’
Step #0 – “Test”: – Hello World! I’m GKE Master Aaron Lee 1228 Step #0 – “Test”: + Hello World!
原來是它檢查我的句子是不是”Hello World!”,只不要是都算錯。
那我還是乖乖改回來:
再commit並push出去:
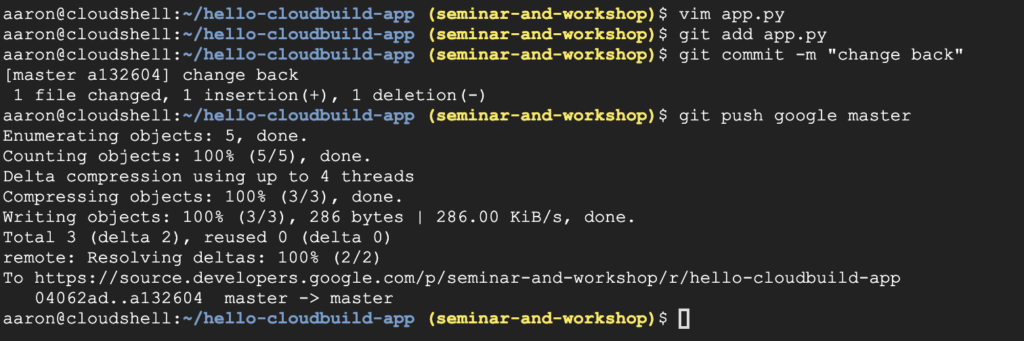
快去 Cloud Build 看看:
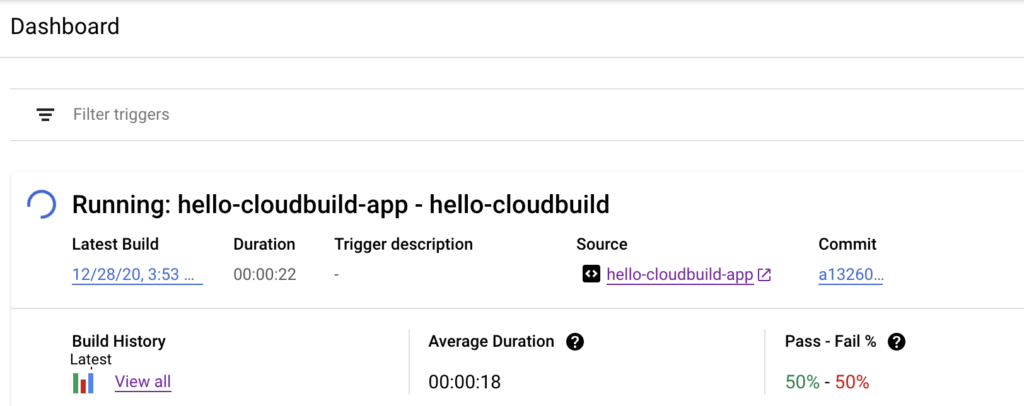
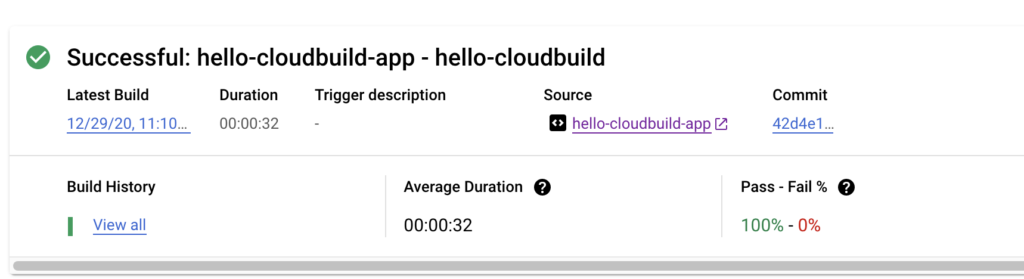
果然成功了!
所以那個測試,是有寫一個規則在裡面嗎?
我找到 test_app.py ,來看看裡面有什麼:
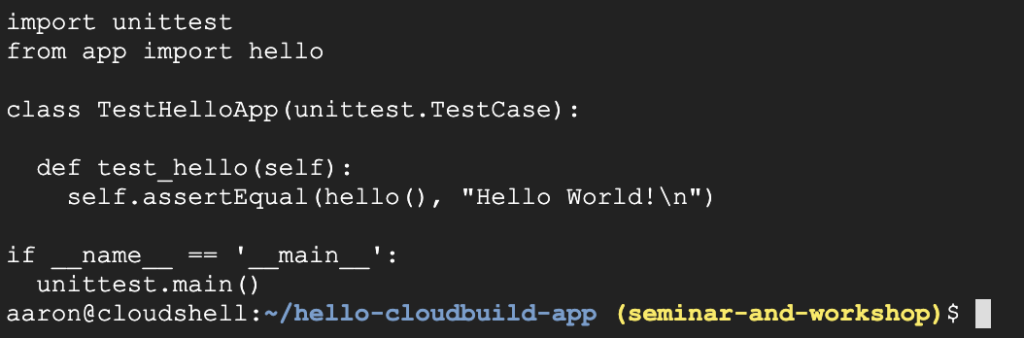
原來就是檢查句子是不是 “Hello World!”
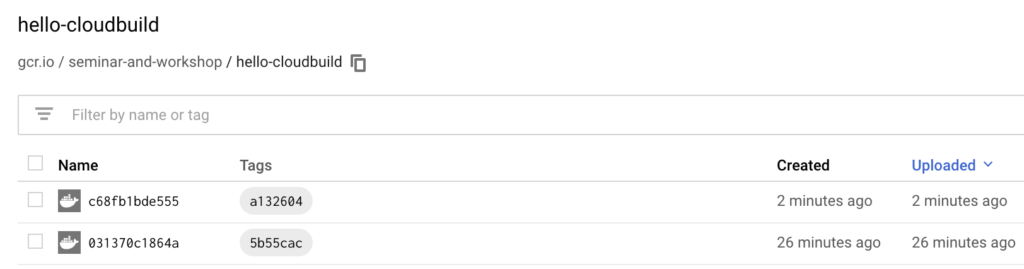
確認Image上來了:
DevOps 教學步驟五:建立 CD Pipeline
接下來開始CD流程。
Cloud build 也可以用在CD pipeline, 每次commit push到 candidate分支就會開始跑。這個pipeline也會套用新的設定檔到GKE,如果成功的話,它會copy設定檔到production分支。整個流程有一些特性如下:
- Candidate分支會放所有要部署的歷史記錄
- Production分支則是只有成功的部署
- 你會在 Cloud Build 看到所有成功和失敗部署的細節
- 你可以重新執行 build 用來回滾到先前的版本,同時回滾也會更新production分支來真實反應deployment的歷史記錄。
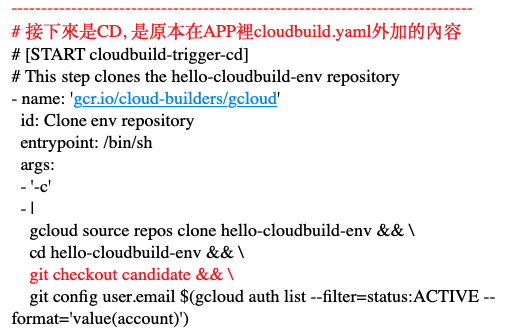
接下來要注意的地方是,你會改掉前面建的 CI Pipeline,去更新candidate分支,觸發 CD pipeline。
授權 Cloud Build 來存取 GKE,像上次授權GitLab存取GCR和GKE是一樣的意思。

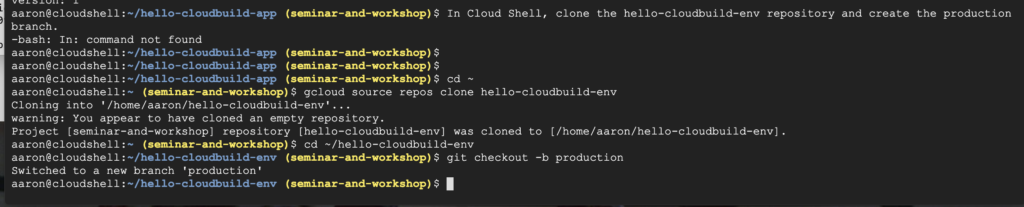
接下來初始化 hello-cloudbuild-env repo,做2個分支
cd ~
gcloud source repos clone hello-cloudbuild-env
cd ~/hello-cloudbuild-env
git checkout -b production
“-b” 代表我建了一個分支叫 production,並且切換到這個分支
目前在production分支 把app repo的cloudbuild-delivery.yaml copy過來 變成cloudbuild.yaml 只是把檔案copy一份,然後就commit上去
cd ~/hello-cloudbuild-env
cp ~/hello-cloudbuild-app/cloudbuild-delivery.yaml ~/hello-cloudbuild-env/cloudbuild.yaml
目前沒有trigger,不會有任何影響。
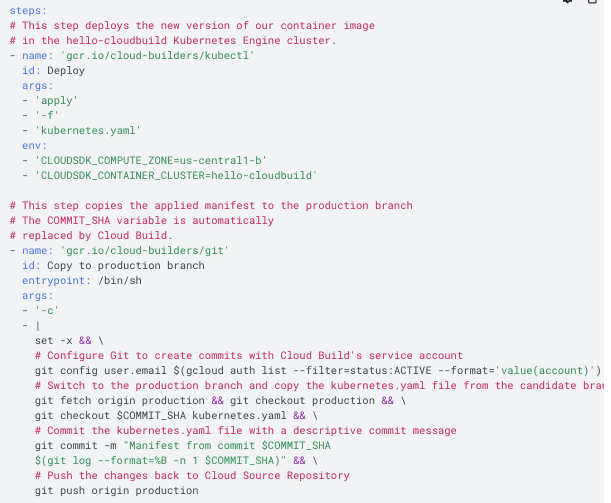
這個檔的內容主要是部署設定檔到GKE,成功的話再把檔案放到production分支。
git add
.git commit -m “Create cloudbuild.yaml for deployment”

再建一個 candidate 分支,並且切換過去:
git checkout -b candidate
把這兩個都push,注意 candidate 是空的,沒錯喔不要懷疑。
git push origin production
git push origin candidate
然後授權 Source Repository Writer角色權限給 Cloud Build service account:
PROJECT_NUMBER="$(gcloud projects describe ${PROJECT_ID} \
    --format='get(projectNumber)')"
cat >/tmp/hello-cloudbuild-env-policy.yaml <<EOF
bindings:
- members:
  - serviceAccount:${PROJECT_NUMBER}@cloudbuild.gserviceaccount.com
  role: roles/source.writer
EOF
gcloud source repos set-iam-policy \
    hello-cloudbuild-env /tmp/hello-cloudbuild-env-policy.yaml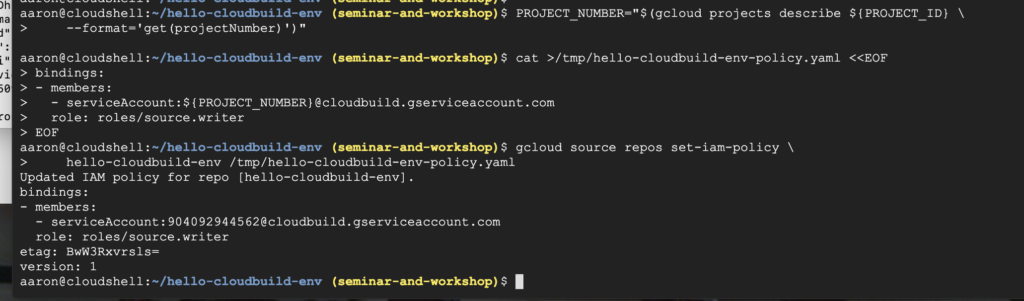
接下來建立第二個Trigger:
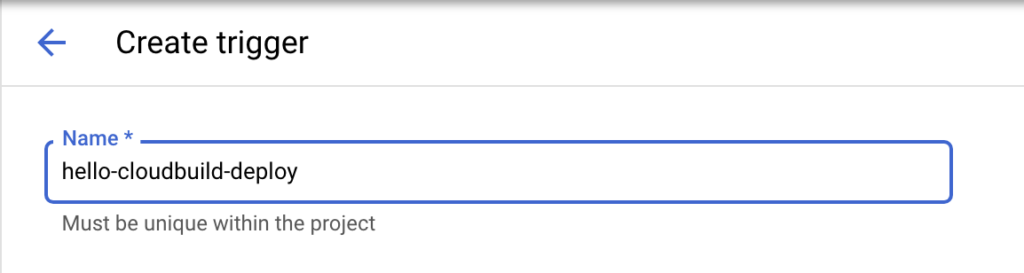
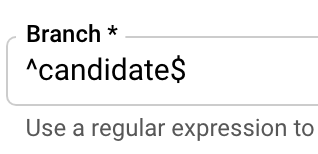
它的意思是,只要在env這個repo裡,有push到candidate這個分支,就執行cloudbuild.yaml (主要會部署 GKE, 並且在production 分支產生k8s.yaml做一個commit)
那這支 cloudbuild.yaml 目前還沒產生,接下來才會出現。(感覺在鋪一個很長的梗……)
DevOps 教學步驟六:更改 CI pipeline 去觸發 CD
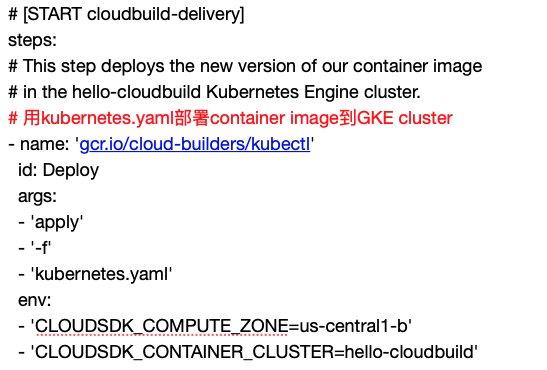
現在要改檔名,把 cloudbuild-trigger-cd.yaml 改成 cloudbuild.yaml
就像上面說的,它會部署 GKE 並且copy到 production
我們看一下這個檔案,因為內容很多又雜,我分段貼出來並且加了一些註解,方便大家看懂(閱讀課開始……):
後面還有…
還有…
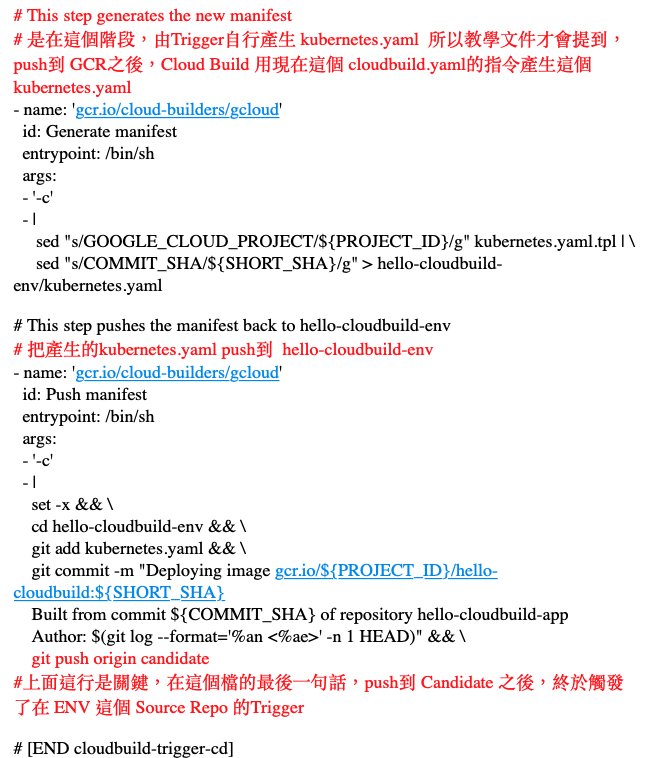
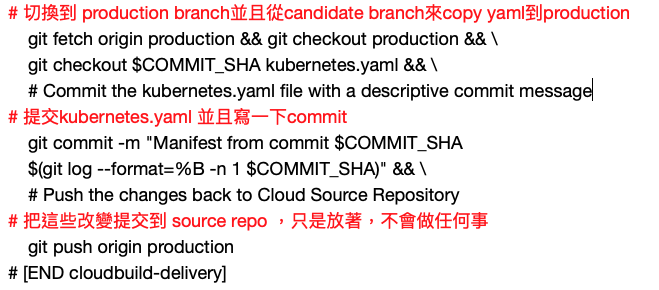
而我們的另一個Trigger,是在 ENV 裡提交 Candidate 之後所觸發執行的工作,來看一下內容(第二堂閱讀課……):
後面還有…
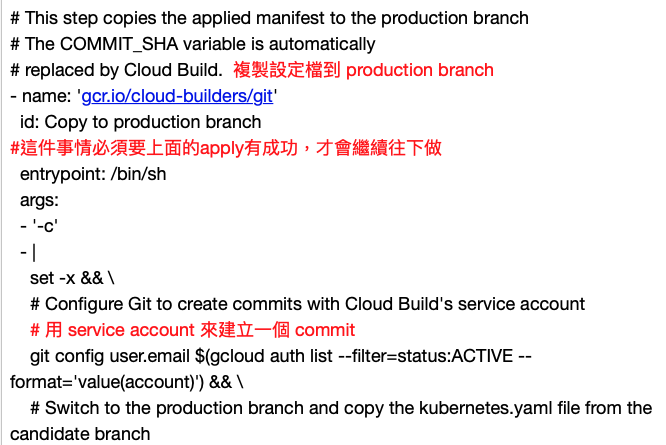
再忍耐一下,快看完了…
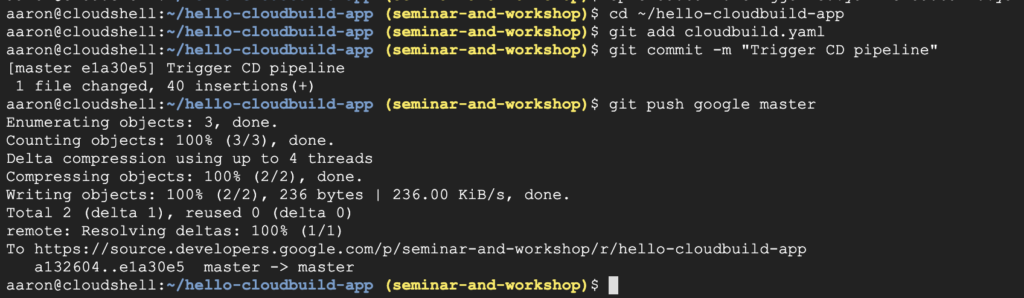
然後把這個push到 app 自己的 repo:
cd ~/hello-cloudbuild-app
git add cloudbuild.yaml
git commit -m “Trigger CD pipeline”
git push google master
這樣把app自己的檔案commit出來,就會Trigger 原本app裡的cloudbuild.yaml (只有CI),以及Env裡的Candidate Trigger (CD: 部署到GKE):
接下來看到 Cloud Build 開始跑了:
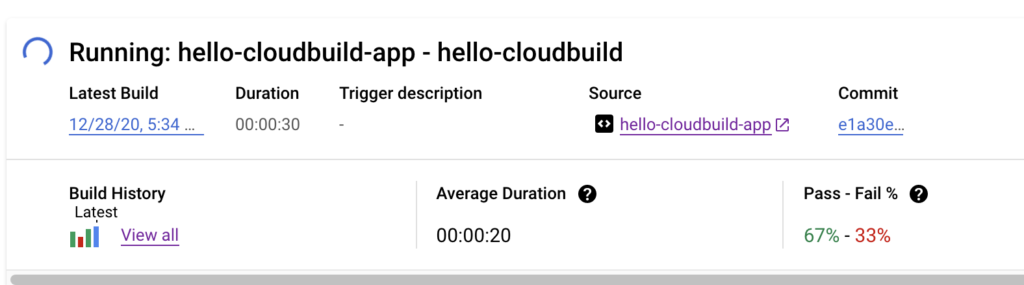
過幾秒之後看到成功:
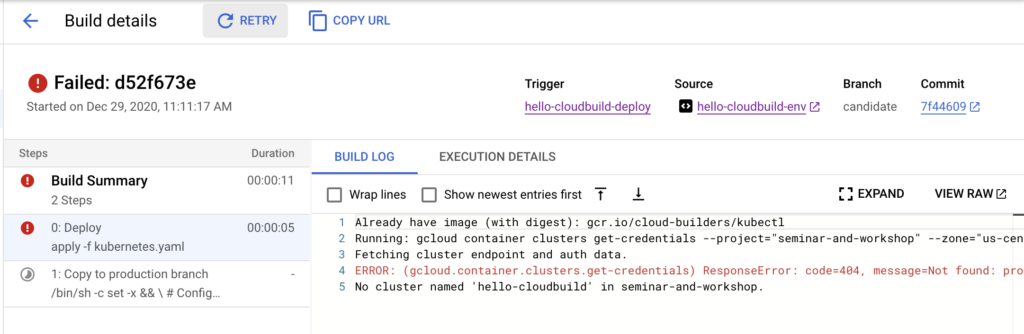
後來發現 Cluster 忘記建了,快來建一下。
(忘記是小事,因為前面就可以花好幾天的時間確認流程,太早建Cluster就只能放在那邊浪費錢,就是等到它提示再建就好了)

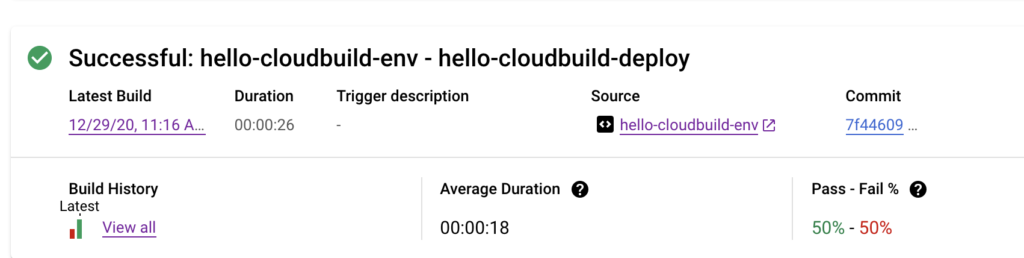
等開好,來按一下retry (貼心的功能不用再重新commit或push)
成功了!
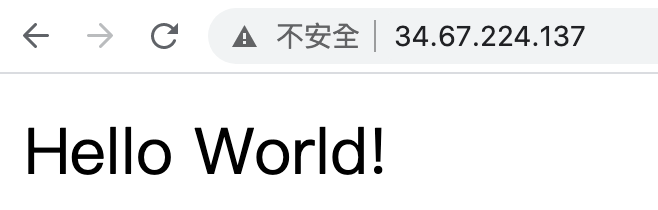
來看一下Service,看到 Load Balancer 有建起來,並且有一個外部IP:
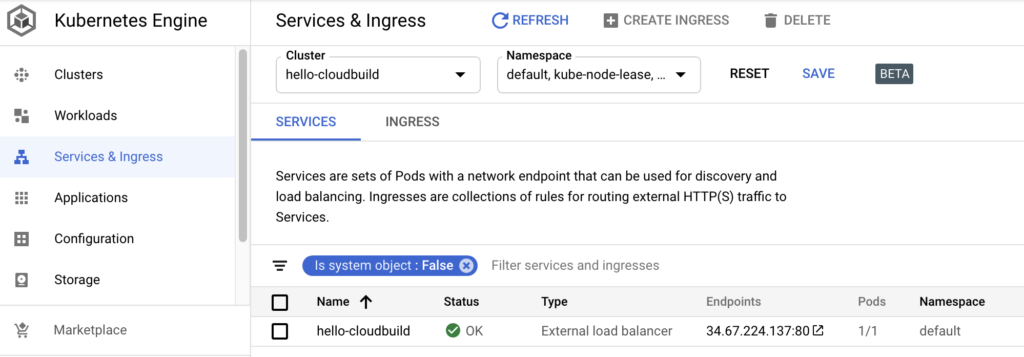
點擊下去看到網頁,終於成功了!
以上就是完整的CI/CD流程,過程中有任何錯誤都可以看得到,因為在 GCP 上多了 DevOps 提到的「透明化」原則,而且都是用代管式的 GCP 服務來達成,其中比較複雜的是 Google 又加入了 Git 管理 (所以在過程中看起來有點亂),又形成了 GitOps,透過Infra structure as a cod 提高了自動化,並減少大量手工(Toil)出錯的風險,對我們未來的產品開發速度大有幫助。
如果還不習慣全代管,要使用 GitLab 的話,可以回來看這篇文章: