
文章段落
此次的 Artificial Intelligence(AI,人工智慧)教學延續之前對 Google AI 聊天機器人開發平台 Dialogflow 的介紹,將示範如何用這項工具打造高擬真的用戶對話體驗,建立出具備租車預約功能的聊天機器人,一起來了解吧!
AI 人工智慧教學彙整
● AI 聊天機器人開發:Dialogflow 介紹
● 機器學習(Machine Learning,ML):工具介紹/Vertex AI 與 AutoML 教學/BigQueryML 教學
Artificial Intelligence 教學:聊天機器人對話流程與架構圖
以下為本次聊天機器人實作教學的對話流程設計(左),和實際在 Dialogflow CX 中規劃的架構設計圖(右)。設計內容包括租、還車的城市與日期,以及預計要租賃的車種和付款資訊,雖然看似複雜且冗長,但如果有理解《Google AI 聊天機器人開發平台 Dialogflow 介紹》中提到的所有功能,其實可以很快地建置出理想的聊天機器人。

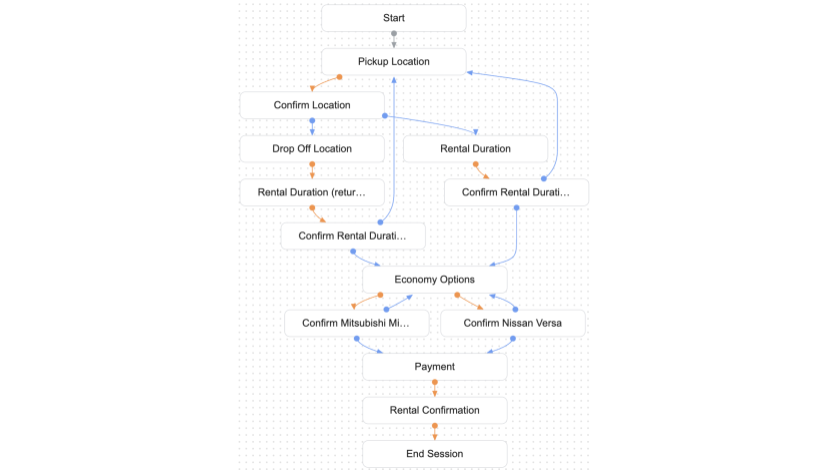
截圖自:Google Cloud Dialogflow CX Console 頁面
©2023 Google
Artificial Intelligence 教學:Dialogflow 對話流程起始
創建一個新的 Agent 後,首先會看到一個 Start 的 Page 在 Console 中間,這個是 Dialogflow CX 預設提供的起始對話 Flow(Default Start Flow)。而作為預約租車的聊天機器人,我們首先要建立使用者起始對話的 Route,也就是當使用者開啟對話視窗後,Agent 偵測使用者第一個輸入的意圖(如:我要租車),作為接下來整個對話流程的起點。此 Route 主要會設置 Intent 及 Trainsition page(作為下一個對話流程的 Page)。
- Intent:
- Intent name:car_rental.reservation_create
- Training phrases:Hi i’d like to rent a car、hi, can you help me reserve a car?、car rental
- Transition page:Pickup Location

©2023 Google
Artificial Intelligence 教學:租、還車地點對話設置
租車地點
修改完起始對話後,我們要來設置詢問租車地點的對話邏輯流程。首先需要編輯 Pickup Location(先前設置的 Trainsition page),而在這個 Page 中,需設置 Parameter 和 Agent,分別用來收集使用者回答的資訊及確認租車地點的 Route。
- Parameter(租車地點):
- Name:pickup_location
- Entity type:@sys.geo-city(@sys 開頭皆為系統預先建立好的類型)
- Initial prompt fulfillment:Where would you like to pick up the vehicle?
- Route:
- Condition rules:$page.params.status = “FINAL”(作為判定此 Page 已結束的條件指標)
- Fulfillment:Ok, your pickup will be in $session.params.pickup_location.($session.params. 目的為將使用者回答的資訊帶入 Agent 的回覆中)

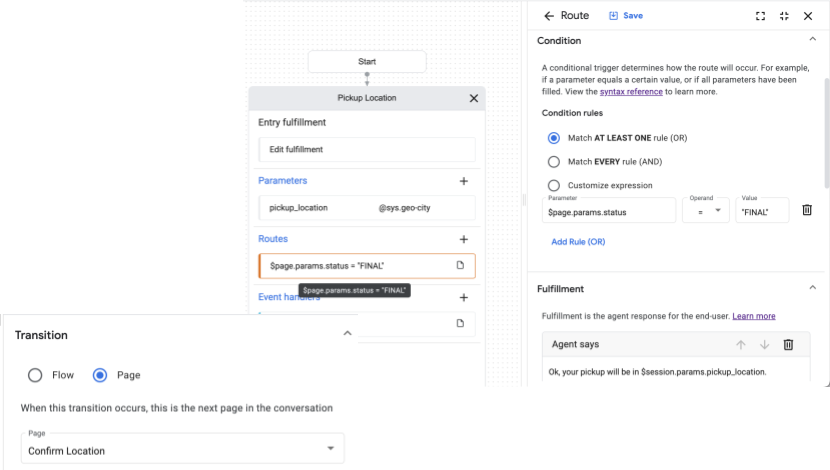
截圖自:Google Cloud Dialogflow CX Console 頁面
©2023 Google
還車地點
設置完租車地點流程後,接著來設置還車地點對話。由於還車地點可以是相同或不同地點,因此會需要在 Confirm Location 這個 Page 的 Entry Fullfillment 詢問使用者「Is your drop off location different from your pickup location? 」再針對使用者回覆的內容增加兩條使用者回答是或不是的 Route。
當使用者需要在不同地點還車時,Route 設置為:
- Intent:
- Intent name:small_talk.confirmation.yes
- Training phrases:yes it is、yes indeed、right
- Trainsition page:Drop Off Location
因為需要收集使用者還車地點的資訊,因此會需要在 Drop Off Location page 中設置 Parameters 及 Agent 確認還車地點的 Route。
- Parameter(還車地點):
- Name:drop_off_location
- Entity type:@sys.geo-city
- Initial prompt fulfillment:Where will you be returning the vehicle?
- Route:
- Condition rules:$page.params.status = “FINAL”
- Fulfillment:Ok, your drop off will be in $session.params.drop_off_location.
- Trainsition page:Rental Duration (return location differs)
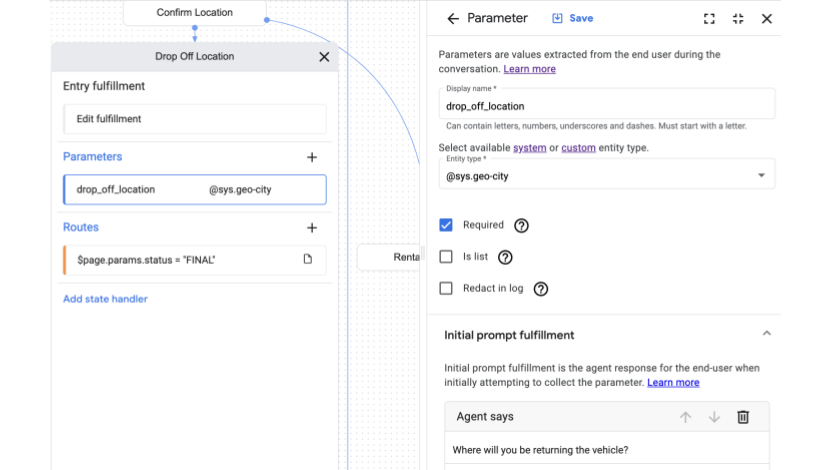
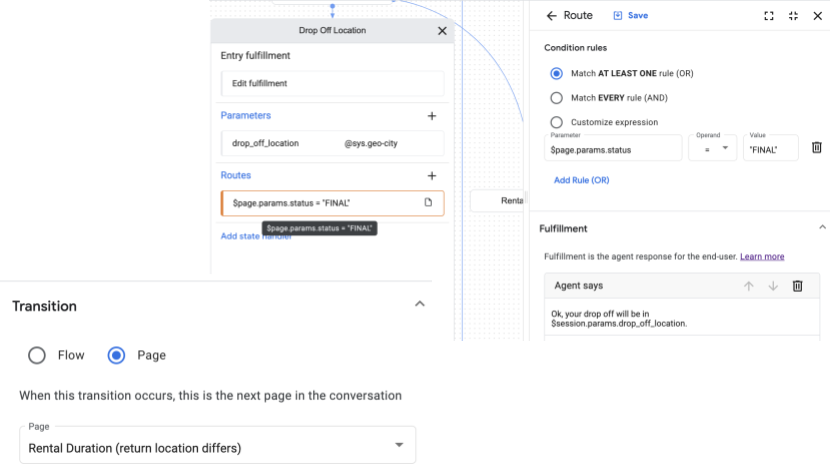
截圖自:Google Cloud Dialogflow CX Console 頁面
©2023 Google
當使用者不需要在不同地點還車時,Route 設置為:
- Intent:
- Intent name:small_talk.confirmation.no
- Training phrases:not this、not right now、nope
- Trainsition page:Rental Duration
Artificial Intelligence 教學:租、還車日期對話設置
租、還車日期的對話會根據在相異或相同地點還車創建兩個 Page,分別為 Rental Duration (return location differs) 以及 Rental Duration。但此兩個 Page 的設置內容是相同的,會需要分開建置主要是因為,後續 Agent 需向使用者確認租、還車地點及日期會不相同才需分開設置。在這兩個 Page 中,需設置 pickup_date_time 及 drop_off_date_time 的 Parameter,和作為結束此 Page 的 Route。
- Parameter 1(租車時間):
- Name:pickup_date_time
- Entity type:@sys.date-time
- Initial prompt fulfillment:What date and time would you like to pick up the vehicle?
- Parameter 2(還車時間):
- Name:drop_off_date_time
- Entity type:@sys.date-time
- Initial prompt fulfillment:What date and time would you like to drop off the vehicle?

©2023 Google
- Route:
- Condition rules:$page.params.status = “FINAL”
- Trainsition page:Confirm Rental Duration 或 Confirm Rental Duration (return location differs)
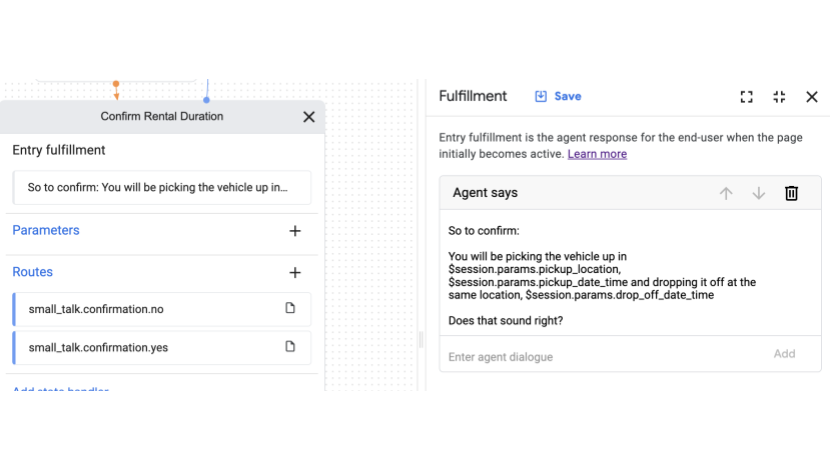
Confirm Rental Duration (return location differs) 對應的 Page 為 Rental Duration (return location differs) 中 Route 的 Trainsition page;而 Confirm Rental Duration 對應的 Page 為 Rental Duration 中 Route 的 Trainsition page。
而 Confirm Rental Duration 及 Confirm Rental Duration (return location differs) Page 的設置,基本上僅差在 Entry Fulfillment 的回覆,其他相同的設置就是針對使用者回覆的內容增加兩條使用者回答是或不是的 Route。
- Confirm Rental Duration 的 Entry Fulfillment:
So to confirm:
You will be picking the vehicle up in
$session.params.pickup_location,
$session.params.pickup_date_time and dropping it off at the same location,
$session.params.drop_off_date_time.
Does that sound right?
- Confirm Rental Duration (return location differs) 的 Entry Fulfillment:
So to confirm:
You will be picking the vehicle up in $session.params.pickup_location,
$session.params.pickup_date_time and dropping it off in
$session.params.drop_off_location,
$session.params.drop_off_date_time.
Does that sound right?

截圖自:Google Cloud Dialogflow CX Console 頁面
©2023 Google
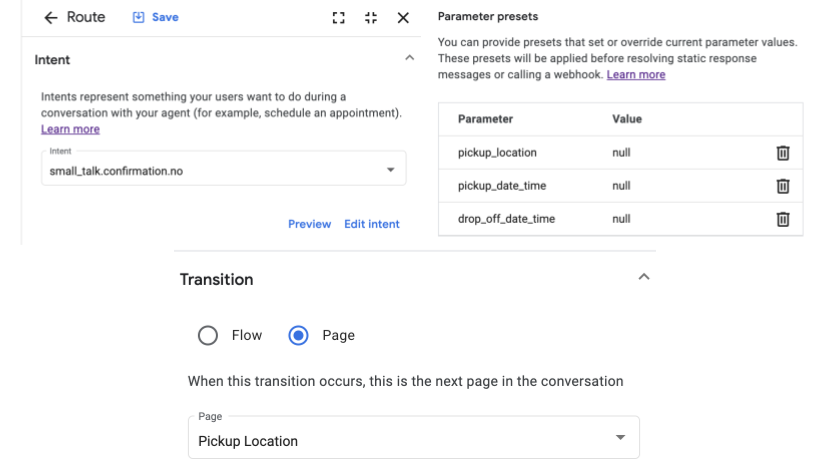
以下為針對上面兩個 Page 設置使用者回答是或不是的相同 Route 內容:
- Route 1:
- Intent:small_talk.confirmation.yes(Intent 可重複使用,沿用先前創建的即可)
- Fulfillment:Great! Now let’s choose a vehicle.
- Trainsition page:Vehicle Options
- Route 2:
- Intent:small_talk.confirmation.no(Intent 可以重複使用,沿用先前創建的即可)
- Fulfillment:Ok, let’s try again.
- Parameter presets:將所有以上 Parameters 設置為 Null。
- Trainsition page:Pickup Location(因為要重新收集租車資訊,因此要選擇 Pickup Location page)
截圖自:Google Cloud Dialogflow CX Console 頁面
©2023 Google
租車種類對話設置
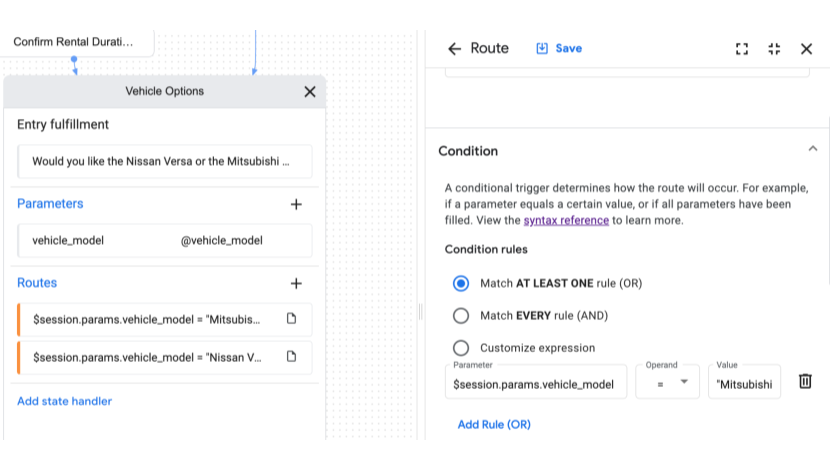
在設置完租、還車資訊後,就要進入車種選擇的對話流程了,也就是上面 Route 1 Transition page 的 Vehicle Options。
- Entry fulfillment:Would you like the Nissan Versa or the Mitsubishi Mirage?
- Parameters(車種):
- Name:vehicle_model
- Entity type:@vehicle_model(自定義的 Entity type,也可選擇系統預建立的 @sys)

截圖自:Google Cloud Dialogflow CX Console 頁面
©2023 Google
- Route 1(選擇 Nissan Versa):
- Condition rules:$session.params.vehicle_model = “Nissan Versa”
- Transition page:Confirm Nissan Versa
- Route 2(選擇 Mitsubishi Mirage):
- Condition rules:$session.params.vehicle_model = “Mitsubishi Mirage”
- Transition page:Confirm Mitsubishi Mirage

截圖自:Google Cloud Dialogflow CX Console 頁面
©2023 Google
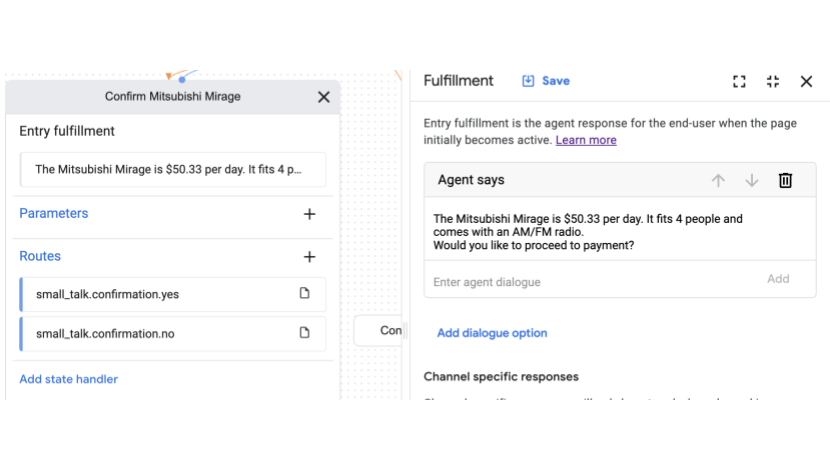
而 Confirm Nissan Versa 及 Confirm Mitsubishi Mirage 這兩個 Page 的目的如前述,主要是讓 Agent 確認使用者輸入的資訊是否正確。因此在設置上,一樣只有 Entry Fulfillment 的回覆會有差別,其他相同的設置就是使用者回答是或不是的 Route。
- Confirm Nissan Versa 的 Entry Fulfillment:
The Nissan Versa is $54.20 per day. It fits 4 people and comes with an AM/FM radio.
Would you like to proceed to payment?
- Confirm Mitsubishi Mirage 的 Entry Fulfillment:
The Mitsubishi Mirage is $50.33 per day. It fits 4 people and comes with an AM/FM radio.
Would you like to proceed to payment?

截圖自:Google Cloud Dialogflow CX Console 頁面
©2023 Google
以下為針對上方兩個 Pages 設置使用者回答是或不是的相同 Routes 內容:
- Route 1:
- Intent:small_talk.confirmation.yes
- Trainsition page:Payment
- Route 2:
- Intent:small_talk.confirmation.no
- Fulfillment:Ok, let’s look at other options.
- Parameter presets:將 vehicle_model parameters 設置為 Null
- Trainsition page:Vehicle Options(以重新選擇車種)
付款資訊表單建立
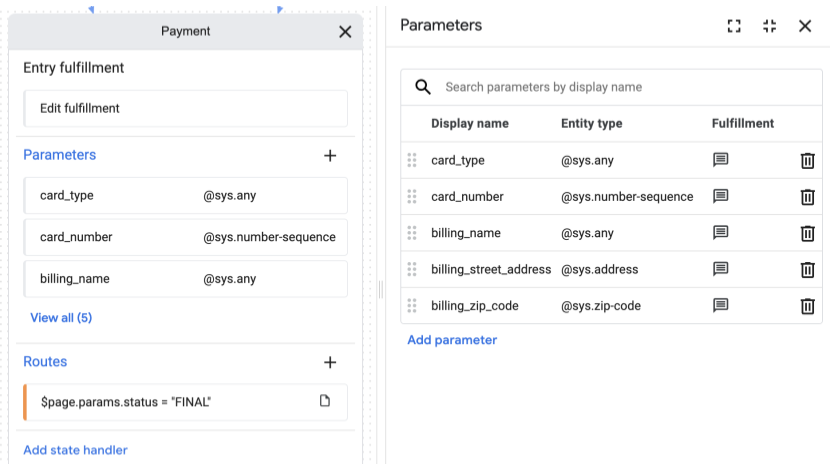
最後一個步驟,就是建立租車付款資訊的表單!因為 Dialogflow 在設計上,無法直接在單一 Page 創建讓使用者填寫的表單(如 Google 表單),所以接續上一個步驟所創建的 Payment Transition page,在這個 Payment 中,我們會需要各別建立付款資訊的 Parameter,用一問一答的方式記錄使用者回答的資訊,取代一次性的表單。以下示範建立五項付款資訊的 Parameter。
- Parameter 1(付款卡種類):
- Name:card_type
- Entity type:@sys.any
- Initial prompt fulfillment:What card type will you be using?
- Parameter 2(卡號):
- Name:card_number
- Entity type:@sys.number-sequence
- Initial prompt fulfillment:Please enter the card number.
- Parameter 3(帳單名稱):
- Name:billing_name
- Entity type:@sys.any
- Initial prompt fulfillment:What is the name on the card?
- Parameter 4(帳單收件地址):
- Name:billing_street_address
- Entity type:@sys.address
- Initial prompt fulfillment:What is the billing street address?
- Parameter 5(帳單收件地址郵遞區號):
- Name:billing_zip_code
- Entity type:@sys.zip-code
- Initial prompt fulfillment:What is the billing ZIP code?
設完上列 Parameter 後,就要來創建作為判定此 Page 已結束收集 Parameter 的 Route 了。作法如同上面設置 Route 的步驟:
- Condition rules:$page.params.status = “FINAL”
- Trainsition page:Rental Confirmation(讓 Agent 向使用者確認整體預約租車資訊)
截圖自:Google Cloud Dialogflow CX Console 頁面
©2023 Google
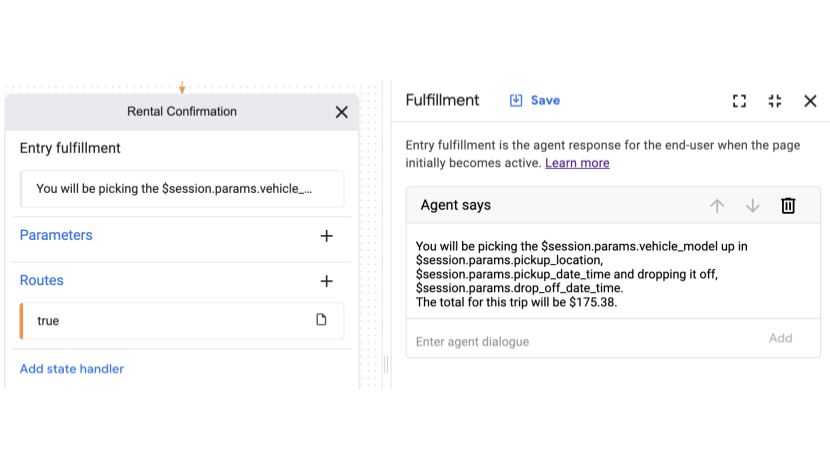
在 Rental Confirmation Page 中的 Entry fulfillment 輸入以下訊息,同時帶入最終確認此次租車資訊的參數(除付款資訊外):
You will be picking the $session.params.vehicle_model up in
$session.params.pickup_location on
$session.params.pickup_date_time and dropping it off on
$session.params.drop_off_date_time.
The total for this trip will be $175.38.
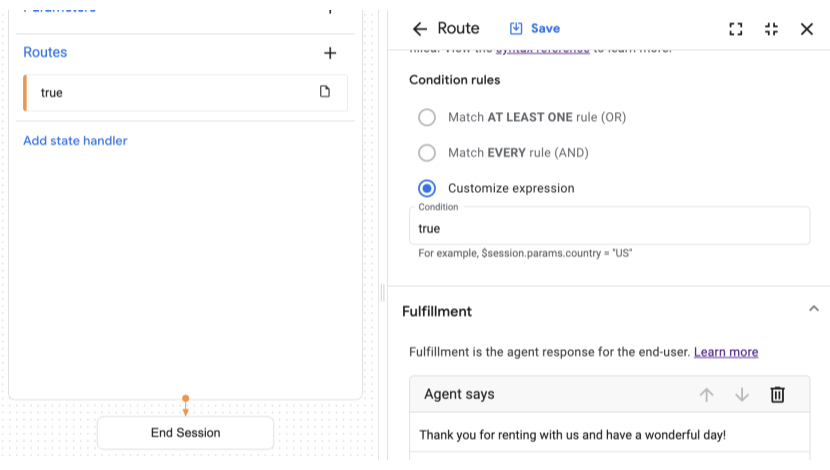
在這一系列的對話流程設置完成後,我們需要讓 Agent 知道此次與該使用者的對話已經結束,因此需要設置最後一個 Route,作為判定這整個對話已結束的指標。
- Condition:於 Customize expression 中輸入 true(讓 Agent 判定無論如何都會觸發此 Route)
- Fulfillment:Thank you for renting with us and have a wonderful day!
- Trainsition page:End Session
截圖自:Google Cloud Dialogflow CX Console 頁面
©2023 Google
大家可以注意到,這次的實作教學雖然有許多 Page,但實際上只有建立一個 Flow。如果了解 Dialogflow 的建置邏輯,也可以嘗試將上述不同主題和對話內容轉換為更複雜的對話,並建立屬於自己的客製化虛擬機器人。
Dialogflow CX 實際環境測試
當以上所有設置都完成後,當然要來實際測試成果是否會如預期地順利囉。以下為大家簡單模擬實際與 Agent 預約租車的整體對話流程。對話順序由左至右。


©2023 Google
這邊補充一點,Dialogflow CX 在單次的對話階段中,所記錄的 Parameters 僅會在對話結束後保留 30 分鐘。此為 Dialogflow 系統預設的時間,目前是無法更改的。
Dialogflow CX 費用介紹
Google 有針對第一次使用 Dialogflow CX 者提供一次性的 USD$600 試用金(期限12個月),這除了對開發者來說非常方便,同時也能節省費用支出。此外,由於 Dialogflow CX 的收費方式比 Dialogflow ES 更簡單,且此次實作就是使用這個版本,因此以下附上 Dialogflow CX 的收費方式。
| 收費項目 | 收費內容 | 費用(in USD) |
| 文字 | 主要依照單個對話 Session 的請求數收費,而請求是指向 Dialogflow 發出任何 API 的呼叫,無論是透過 API 直接呼叫,或是透過整合功能或主控台間接呼叫皆包含在內。 | $0.007 per request |
| 音訊輸入/輸出 | 包含語音辨識、speech-to-text、語音合成、text-to-speech、電話通訊服務。 | $0.06 per minute(最低收費標準為一分鐘,之後以每秒 $0.001 為單位做收費) |
額外向大家補充一點, 為確保開發者能在開發階段即時確認 Agent 是否訓練完整,Dialogflow Console(無論是 ES 或 CX 版本)裡面有一個很貼心的 Test Agent 功能,讓開發者在加快開發速度的同時節省費用。不過要特別注意的是,如果想確認一些進階回覆的設計樣式,例如 Custom Payload,在 Test Agent 裡是無法完整呈現的,因此還是需要透過整合功能才能查看實際對話呈現的樣貌。

©2023 Google
以上分享了 Dialogflow CX 的完整實作教學。大家針對文中內容如有任何問題都可留言詢問,若想要深入了解 Google Cloud,也歡迎聯絡 Cloud Ace 獲得更進一步的資訊。
▋延伸閱讀:
・Google AI 聊天機器人開發平台 Dialogflow 介紹
・Vertex AI 教學與介紹 – 實作以 AutoML 訓練機器學習模型
・使用 BigQueryML 來預測新生兒體重
・以更好上手的機器學習工具,普及化資料分析與洞察
・大數據應用實踐懶人包!步驟、工具、目標建議一次了解